When you click on links to various merchants on this site and make a purchase, this can result in this site earning a commission. Affiliate programs and affiliations include, but are not limited to, the eBay Partner Network. As an Amazon Associate I earn from qualifying purchases. #ad #promotions


Local Ai 8 GPU Home Server Build Guide
Creating a large count GPU local Ai server is a challenging proposition given the current state of elevated GPU prices we have as a result of several culminating crises related to Datacenter consumption and no small amount of B.S. around suppliers. This has led to a scenario in which being highly flexible in the acquisition of GPUs that are a good price when you find them is ideal. This has also led to buying lesser GB VRAM GPUs in an effort to make up with higher overall count of GPUs to save costs and/or get more VRAM. All of this leads to several challenges which I have addressed and presented a good reference design for that does not compromise on noise or cooling while increasing the available GPU footprint capacity. While the parts in the article are aligned to the video I released on this, there are alternative parts that I have listed throughout this article which are good to consider as well. This system is flexible in that it can accommodate any GPU size. While I will use mine for the outline and example below, this is highly flexible so use whatever you have already and can find at good prices!
My 8 GPU Rig Materials List
Ai Rig Setup Steps
Step 1 – Setup your GPU Hanging Rack
When you are selecting a rack, be sure to prioritize a rack design that has ample venting slots for each row and not solid bottom ones. Ensure your rack is level and in its final position before installing your hardware.
Assemble your rack
This should be very easy and go fast if it is at all like the one I have. While I am using a plastic rack for mine, you can use a metal wire rack but you would have additional things to do to secure the cross supports for the GPUs. Site location is important, and you should consider airflow and available access to electrical circuits that are adequate for your anticipated power draw. In a residential setting you should consider getting an electrician out to install any additional circuits and ideally a 220v 30amp 10 AWG circuit which can then power a few PSUs without issue from a single point. Ensure you have a flat and level surface that is 3 ft side by 2 ft deep to setup your unit on. It will be easier if you have at least 2 feet of room in the front, back and to one side to get everything installed. You should have a power drill with a few bit sizes that are smaller that you will use to predrill holes to run wire through.
Install the Front Hanger Dowel
A 3/4″ by 3/4″ square dowel is what I use as it gives a good place to predrill holes and leave space on both sides that is very adequate.
I would not go larger or smaller unless you find a different material, likely angle metal, that could also accomplish this. If you use metal, you should predrill your GPU mounting locations and plan more meticulously vs wood dowel. Ensure no metal shavings come close to your motherboard. Do use a center support for a wooden dowel as the weight of GPUs will be too much to support otherwise.
Predrill your mounting locations to the legs, measuring down 4″ from the top to ensure you have adequate top space.
Step 2 – Hang your GPUs
Place first GPU into rack to the furthest right location (facing from front of rack) and decide on first mount spot. Leave a bit of room off the edge for the racks support leg maybe 1″ or so. Mark the GPU brackets hole that is fully enclosed and not the partially enclosed one. Possibly stack stuff under the back end to help if you do not have a second set of hands to assist. Ensure you have a clear shot down from the top ridge of plastic you will drill into to the GPU tie-in support location.
Put the first GPUs riser on and attach to motherboard on rack and make sure you have enough space in your intended placement. If you have 3 slot wide GPUs, you could fit 8 GPUs per row and maintain a 2″ gap pretty easily. 2 slot wide GPUs you could fit 12 per row and have 2″ gap between them.
Step 3 – Mobo/CPU Hardware Install
Get your motherboard installed on the Mounting Plate. Decide if you will be using PCIe cards in the PCIe slots or risers. For 8 GPUs, you do not need to use PCIe risers. If you want to hit 16 GPUs you need a few PCIe bifurcation cards and will want to find a way to affix the mounting edge or some other similar supporting arrangement. Install the M.2 to PCIe riser.
Install the CPU. Thermal paste for the cooler, you may not want to run a waterblock and that is probably just as well. Air cooler options do exist but the largest SP3/5/6 Air coolers with massive fins will hit the bottom of any GPUs installed above them.

Step 4 – Power Supply and Cable Management
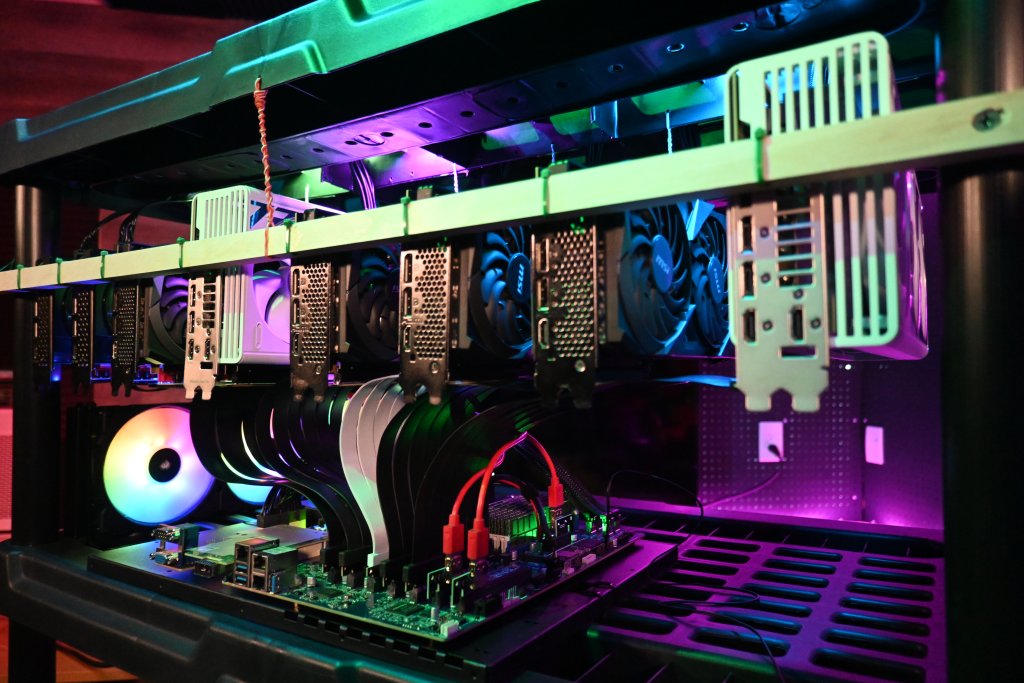
Installing the PSUs at the top of the rack provides a good way to route down through the airflow mesh directly into the GPUs below, with the ability to keep cables also pretty tidy.
You can affix your PSUs to the top with of course… zip-ties. You can then use those zip-ties to loop up your power cables.
The PSU ATX 24 pin power cables are pretty thick so you likely want to bundle them up together as much as possible.
Step 5 – Cooling a Multi GPU Rack
I use a box fan that is capable of providing frankly insane airflow for an entire row of gear by off-centering at an angle from the back blowing across the entire backs of the GPUs and pushing air forward.
It also cools the system board, and especially the OCP2 spec Mellanox CX-545b 50Gbit network adapter, which requires decent airflow to not melt.
Step 6 – The NEXT 8 GPUs (pics soon)
If you are setting this up like me you are already likely thinking of those next 8 GPUs that you will install. Let me outline what that would look like for you in steps here:
Install second dowel on next rack row under motherboard. Possibly with a top down on leg tapping of 6″ spacing.
This is also exactly why you hopefully have bought a 24″ deep rack and not an 18″ deep rack. You will not have space to place the new set of PSUs with just 18″ deep.
Additionally if you are running this new set of cables to the GPUs, you will need to route them under the current motherboard and affix them to the ridges on the underside.
This is also why you have 2 extra inches of space at the top, so you can control the bend radius of higher powered GPUs. Hook and loop (and lots of it) to the rescue!
Check out the video guide:
Local Ai Homelab Tips
While I have gone over how I adapted my hardware to this setup, it is really flexible so you can mix in a lot of different hardware and it still work out just fine, in fact you should in an effort to save money. Be sure if you do an adaptation to drop a comment on the video and let me know how you did it differently! Patience will be your most valued skill in building this out, it will take at a minimum a few hours most likely and possibly several.
GPU Count and VRAM
In Local Ai, the amount of VRAM available to run a given workload is the most important factor and directly leads to significant improvements in output speed and larger models are indeed “smarter” typically. Mid-range models are now highly capable of both running in agent harnesses off local models as well as running traditional chat interfaces in the 128GB to 256GB and under VRAM range. MiniMax 2.5 in Q4 being exceptional in this range. However getting to greater than 128GB in even 24GB GPUs is no small matter. Ideally you can afford a few RTX 6000 Blackwell, but reality is that is a very small amount of users who can drop 7-8K at a time per 96GB VRAM GPU. Most users need to grow incrementally and this plan presents a flexible manner to achieve this. Finding a deal will likely mean growing your GPU capabilities one at a time.
LLMs and VRAM Demand
Looking at a few popular current models in this range and their VRAM demand at an acceptable quant size is presented in the following table. Keep in mind you can extend your usable footprint with traditional system memory, but with that also being highly impacted by recent price hikes it is much less desirable. Especially since you can as a rule of thumb count on a 5x to 10x slower performance per token, often dragging into the low single digits. Usable in a chat, but certainly not for agentic work nor coding. For this reason we will focus only on what fits in a VRAM footprint with adjustments down in CTX size and no sharding to system memory.
GPU Risers for Local Ai LLM and Video Generation
There are a wide variety of GPU risers and a few things I think you should know about using certain use cases like Image and Video generation that will impact performance, and other use cases like textgen that are not impacted. This specifically is a result of the bandwidth between the GPU and the system. Textgen does not have high demands for the PCIe bus when using Llama.cpp and a x1 PCIe3 will be just fine when running inference. It will load a model slower however so you should use USB based risers on the lower end of any GPUs you have if you want to do Video or Image generation. The follow types of GPU risers should be considered and I have created a table for you. As well this is specific to PCIe Gen3 and Gen4 speeds, with PCIe5 you will need to explore retimers for many risers to operate at full performance. Some Motherboards will have a few Gen5 retimer slots available like the ASUS Pro WS WRX90E-SAGE SE.
USB GPU Risers
These are relics from the age of GPU Mining era. They are also VERY CHEAP and are not intended for high bandwidth applications. Inference workloads like Textgen are low bandwidth on the PCIe bus after the initial loading of a model. Video and Image generation are higher bandwidth and you should absolutely not use USB risers for those GPUs, they will be up to 32x slower. They are great however for having the ability to run the minimum signal over a pretty long distance. They often come with Molex, SATA and 6 pin power. Molex you can run 2x off 1 cable strand back to the PSU. Likely that leaves 2 or 1 empty on each molex run, but is still a great way to attach lesser GPUs that are mainly intended to grow VRAM footprint for Inference in larger models.
Retimers are needed if you have signal issues which can occur for a lot of reasons. Generally speaking a longer Gen4 cable can be marginal at long distance and will negotiate down generation if there is issues. Inferior quality risers will negatively impact your ability to have a stable connection holding which will manifest especially in high bandwidth applications. At long lengths and most Gen5 speeds, retimers become a must. I personally think avoiding Gen5 capable GPUs makes sense right now given the insanity of prices we are seeing for the modern edge of consumer and prosumer compute.
GPUs I am using
These are challenging times as any GPU shopper knows, but price per GB is still the primary metric of importance with one important caveat related to the current crisis. That is scale up as a priority. The amount of RAM needed to clip closer to the frontier is growing and the best way to solve this is to fit more GPUs on a single server. The GPUs you will be most likely to acquire will either fit into one of two bandwidth brackets. That will directly impact performance dramatically. The lower end GPUs clump up around 320 GB/s to 450 GB/s 3060 12GB to 4060ti/5060ti 16GB GPUS and the upper end is right around 900GB/s to 1TB/s in the 3090 and 4090 class. If you can getting all the same performance bracket GPUs will be the best performance vs mixing 50/50.
3090 https://geni.us/GPU3090
5060ti 16GB https://geni.us/5060Ti-16GB
4090 https://geni.us/4090_24GB_GPU
Considering the Nvidia P40 24GB GPU is possibly not a horrible idea if you can handle that many blower fans noise levels. It is not going to be quiet at all but….price.